As a kitchen and bath designer, before ordering custom or semi-custom kitchen cabinets, you need to measure on site to confirm your design fits the space and to align trades with the installation. This step is a final check to make sure everything is signed off correctly before production of the cabinets begin. A clear, accurate site measure helps avoid mistakes, catches surprises early, and leads to a smoother install.
It is the cabinet designer’s job to measure the space and align their design with the ongoing construction of the home. This step-by-step process will include (but is not limited to) measuring wall distances, finding the center point of key appliances, and confirming ceiling height. This validation process is key; never solely rely on a builder’s plans, homeowner measurements, or contractor’s drawings for your cabinet design. Always go to the job site to measure for yourself and mark out key features of the cabinet plan.
These are important steps to double-check before cabinet installation.
A Step-by-Step Guide to a Kitchen Cabinet Site Measure
- Start with Fixed Elements
- Finding the Window Center
- Layout and Measure the Perimeter Cabinets
- Markout the Appliance Centers
- Measure the Island Space
- Checking Ceiling Height
- Check Your Design Plan
- Finalize Before Ordering

If you prefer to watch, our course “How to Conduct a Site Measure” is included in the Decor Academy, a professional development hub full of resources for kitchen and bath professionals.
Designer Tools to Complete a Site Measure
These are some of the tools we recommend a designer use to conduct a site measure. Measuring custom kitchen cabinets (or semi-custom) requires accurate measurements of the pre-renovated space or of an unfinished space. These tools will help you quickly and effectively measure the home.
- Tape measure
- Laser distance measurer*
- Level or straight edge
- Painters tape
- Carpenters Pencil
- Copy of your floor plan, design, and elevations
- PPE required for site visit
- Phone to take photos
*A laser distance measurer is not a must-have, but it certainly makes measuring large spaces easier. This is a tool seasoned designers would use.
1. Start with the Fixed Elements
A good place to begin is with elements that are difficult to move. This includes:
- Windows
- Plumbing locations
- Appliances like ranges and refrigerators
These are often tied to plumbing, electrical, or the main structure, making them reliable reference points. Starting here gives you a clear anchor to build the rest of the layout. For the sake of the article, we will start with the window, which will be centered with the sink cabinet. You can start with any fixed element and work your way out from there. Some designers prefer to start in a corner and work their way out from there.
You’ll want to have a copy of your design drawings with you to reference as you go.
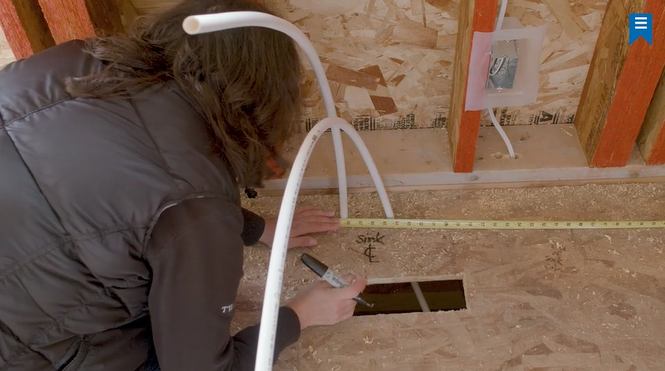
2. Finding and Measuring the Window Center
The window is a natural focal point, and cabinets are often designed around the placement of the window. Measure the full width of the window, then divide by two to get the center.
Example: Window width is 34.5″ ÷ 2 = 17.25″ for the center.
Mark the center point with painter’s tape. You’ll also want to mark on the floor where the center is.
Then, measure from the wall corner (or where you will end your bank of cabinets) to the window center. If drywall is not installed, include a 0.5″ allowance for the drywall in your measurement. Note these measurements to refer back to when you get back to your computer.
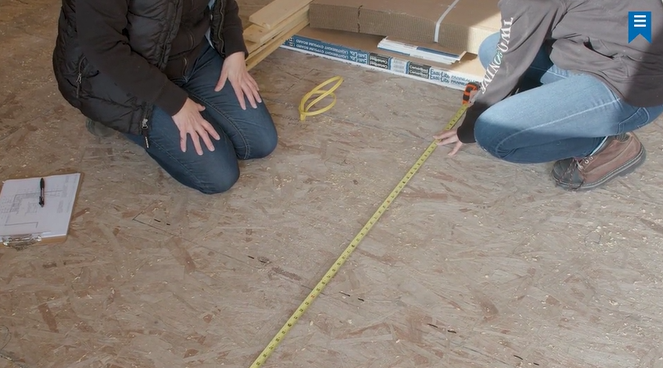
3. Layout and Measure the Custom Perimeter Cabinets
Once the window center is confirmed, move to the sink and base cabinets. The sink cabinet is often placed under the kitchen window, so if this is the case, as in this example, you’ll want to start there for measuring your cabinets.
Start with plumbing. Confirm the plumbing aligns with the window center, then mark the sink center on the floor so it is clear for installers. This gives you a solid reference point before laying out any cabinets. From there, map out the sink base cabinet by measuring half the cabinet width on each side of center.
For example, a 33″ sink cabinet would be 16.5″ on each side.
Mark both sides clearly, then continue measuring outward for the adjacent cabinets. As you go, include filler and end panels so the full wall is planned, not just the center point. You will also want to include appliances if they are on the same wall as the sink cabinet.
4. Markout the Appliance Centers
Next, confirm the placement of the range and fridge. Mark the centerline of each appliance on the floor, in a similar fashion to how we measured the window and sink cabinet.
For example, if the range center is at 58″, mark that clearly on the floor. If drywall is not installed, remember to account for it (0.5″) when measuring out from a wall.
From those centerlines, measure outward to place the surrounding cabinets and fillers. Clear markings help trades understand your layout without confusion.
5. Measure the Custom Island Cabinets
After the perimeter cabinets are measured and confirmed, move to the island. Start by measuring the distance from the front of the perimeter cabinets to the front of the island cabinets. This ensures you have proper clearance. The NKBA has planning guidelines for working zones and accessible standards for movement through a kitchen walkway.
Then mark the full island layout on the floor including:
- Front and back of cabinets
- Cabinet depth
- Any countertop overhang
Use a straight edge or level to connect your marks so the layout is easy to read on site.
6. Checking the Ceiling Height Measurement
It is important to double-check the ceiling height. This way you can confirm upper cabinet heights, tall cabinet height, and crown moldings, to make sure everything fits as planned.
Check the floor-to-ceiling height in a few spots, especially if the ceiling is not perfectly level. If flooring is not installed, include that thickness in your measurement.
7. Check Your Original Design Plan
After your site measure, make sure you double-check your design plan in the software you created the cabinet layout in. Some programs add in extra clearances, for example, Design Flex, formerly 2020, adds space for window trim automatically. Make sure your plan matches what you are measuring on site.
This will catch errors like a window being installed slightly off center, or plumbing needing to be adjusted early, so the contractor can have these items fixed before construction moves ahead.
8. Finalize Measurements Before Ordering
Once everything is measured, update your drawings, share the details with the contractor, and confirm the plan with your client. From there, you can send the order to your cabinet manufacturer.
A benefit of partnering with Decor Cabinets is a dedicated customer service representative who will double-check your order, drawings, and elevations, catching any small errors before the order goes into production. This helps ensure the cabinets are made to the correct specifications and avoids warranty issues.
Additional Designer Tips for Measuring Custom Kitchen Cabinets
- Take pictures as you go so you have a point of reference when you get back to the office.
- Measure twice and double-check as you go to ensure correct measurements.
- Use inches as your unit of measurement.